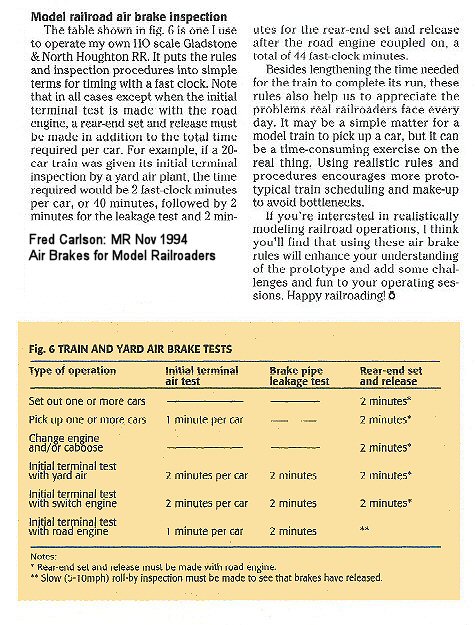
Engine Terminal Operation Car Load Modeling Estimates
Estimating carloads. For operating purposes, we need to make some rough estimates to determine how many carloads of material a model engine terminal would consume in a day. Begin by making a list of the locomotives your engine terminal services daily and group them by size.
For coal, add up the tender capacities (often marked on
the rear): switcher tenders carry 8 to 10 tons of coal, the medium-size
tenders hold 12 to 16 tons, and large tenders can haul anywhere from 20 to 25
tons or more. As an example, let's consider what a fleet of 10 locomotives
would need:
2 switchers x 1 = 20 tons
6 medium engines x 16 = 96 tons
2 large engines x 22 = 44 tons
The total is 160 tons of coal, so using steam-era 50 ton
hoppers, these engines would require about three carloads a day.
Ashes: 10% of total tons coal used. Gondola for example as = 50 tons, thus every 5 days
Diesel units have fuel tank sizes ranging from 600 to
5,800 gallons, and their fuel mileage varies widely due to throttle settings
and speed. If a modern terminal provides an average 500-gallon refueling to 10
units a day, it would require a 20,000 gallon tank car of diesel fuel every
four days.
Sand use varies widely. Steam and diesel locomotives have
sandboxes that commonly carry between 25 and 50 cubic feet of dry sand. If the
10 engines use about 350 cubic feet a day, that translates into about one
two-bay covered hopper every six days.
Using this information, a waybill system can be arranged
to bring in three loads of coal per operating day, a load of diesel fuel every
fourth operating session, and an occasional car of sand. Note that the yard
must always have a loaded car on hand to replace an empty since the engine
servicing work is continuous.
Running repair terminals often receive fresh wheel sets
and rebuilt traction motors from a heavy-repair shop. These materials arrive
on modified that are then reloaded with worn-out items to be returned to the
major shop.
Locomotive shops don't provide many outbound loads, other
then occasional gondolas of scrap metal. In the steam era, cinders from the
ash pit were shipped out in old gondolas or twin hoppers to be used as fill.
Jim Hediger, MR Sept 2007, p.28
East Williston Station 1916 Drawing: Dave Morrison
Dimension
Data: Courtesy Sam Berliner III
click to enlarge for HO scale
55 Gallon
Drum Colors were usually indicative of the manufacturer.
Petroleum:
Standard Oil - blue
Shell - yellow / red
Quaker - State green
Union Oil - blue / orange ends
Texaco - grey / green
Havolin - black
Richfield - cream
Non-petroleum:
hazardous - red
platinum containing catalysts - orange / black
others - black
Also, you can place them in the back yard of a rural home. Paint the thing a
dirty rust color on the sides and grimy
black on the top. Closer to the bottom, leave remnants of the "original" oil
company color showing, fading to rust as you move up the barrel. Then put
a tiny scrap of tule (veil material, like for a wedding veil) on the top painted
rust color, but darkened in the middle with burnt umber mixed with black to
simulate a burnt wire mesh. Presto -- a burnt barrel -- very common near farm
houses and other rural residences.
1969 Freight Car Types in Service
| Box | 394,074 | 22% |
| Box - Equipped | 162,154 | 9% |
| Covered | 161,068 | 9% |
| Flat | 122,705 | 7% |
| Reefer | 115,844 | 6% |
| Stock | 12,169 | 1% |
| Gondola | 200,414 | 11% |
| Hopper | 405,829 | 23% |
| Tank | 180,797 | 10% |
| Other | 39,601 | 2% |
|
TOTAL |
1,794,655 |
Caboose servicing: Most model railroad yards include a caboose track but very
few modelers ever bother to detail the adjacent servicing area. You don’t need
much as the caboose crews normally picked up what they needed when they
restocked the groceries. Any mechanical problems were fixed on a nearby freight
car repair track.
A small shed, like the Pikestuff HO no. 5 small yard office, stored caboose
supplies like paper forms, fusees, journal coolant, flags, paper towels, and
toilet paper. Some sort of elevated tank in modern times or a coal bin in
earlier eras, was needed to resupply fuel for the stove. Skids of coupler
knuckles and air hoses were normally stored outdoors. A water hose was required
to refill the tank inside the car and ice was needed for the icebox on older
cabooses (modern types have an electric refrigerator). Add some trash barrels
spaced along the track and a company pickup truck or two, and you have a neat
new mini-scene your train crews will appreciate. – Jim Hediger, senior editor
Telephone Poles
Bell Common Practices
City poles telephone:
75 ft on street 40' poles 6' in ground. Tel cable 18' off ground additional
40 inch minimum clearance to electric lines.
Rear yards: 30ft light duty poles. Usually every other yard. Cable height
varies 12-18ft depending on power share requirements.
Rural: 75-100 feet. Tel cable 18' off ground 40" clearance to electric
lines.
Provide great info for historians, modelers and
buffs:
1. Shipper info
2. Consignee info
3. Special instructions
4, Dates
5. Car types
6. Load Info
7. Costs
8. Routing Info
9. Car numbers
10. Railroad of said car number (i.e. PRR #489567 as an example)
For actual waybills for the LIRR c.1909 Click Here
You are on the right track. Actually, I mixed up a combination of Polly
Scale Railroad Tie Brown with Model Flex Grimy Black on a painter's easel.
I then diluted it with tap water and slopped over an entire side of the long
hood. Next, used a cotton swab dipped in decal setting solution to wipe off
most of this "goop." This wiping off with the swab is in a stroking motion
from the roof to the walkway. Next, I repeated the process on the other
side of the long hood, then on each side of the short hood and hood ends.
The cab was last.
This method of weathering is almost exactly the same as I do with freight
cars. One nice aspect of it is that you can leave on or take off as much of
the weathering goop as you like. You can take off almost all of it should
you not like what's happening! 8~)
The roof trucks, and pilots get the same grungy paint color, but thinned
with isopropyl alcohol (instead of tap water) and sprayed on with an
airbrush at approximately 15 psi.
Series 503829-503888
Former Number Unk Former Series Unk
Built 4/76 Rebuilt N/A
Car Manufacturer SIECO Location Ashland City, TN
Lot Number Unk Plate B
AAR Class XM RR Class N/A
IL 50-6 IW 9-6
IH 10-7 Door Style SCD 6-Panel w/NRUC plate
Door W 10-0 Door H 9-11
Cuft 5277 Ld Limit 156,500
End R3/4 IDN, wrapped around, welded Cushioning None
Truck Unk Wheel Diameter 33"
Hand Brake Unk Date Painted 8/81
Photo Location Seattle, WA (UP) Photo Date 4/93
Modern Freight Service: Genesis 50-Foot SIECO Boxcar by Bob Hayden
Boxcars remain an important part of North America's freight car fleet, although
they are gradually being replaced by intermodal vans and trains. Most were built
in the 1970s when variations on the popular exterior-post design were produced
by all the major makers.
Southern Iron & Equipment Company (SIECO/, a division of Evans Products, started
producing this 50-foot boxcar in the early 1970s and continued production into
the next decade. The design featured eight panels on each side of a 10-foot
door, inset dreadnaught ends, and an X-panel roof. These cars conformed to the
Plate B clearance diagram and had a little more than 5,000-cubic feet of
interior capacity. They were purchased as part of the boxcar ownership boom of
1970, and many were resold when they were no longer needed on the big roads.
Details and Surprises Underneath
Made in China, the SIECO boxcars come packaged in the familiar yellow-and-blue
Genesis window box. The standard of finish is very high, with a smooth paint job
from top to bottom, crisp pad-printed lettering, and a multicolor ACI label
appropriate to the car's vintage. Hand grabs and ladders are free-standing
parts, as are the stirrups at the corners of the car. Worthy of special mention
are the delicate see-through photo-etched stainless steel end walk platforms.
These details call for careful handling; it's probably a good thing that the car
doors do not operate!
All brake piping and rigging is present, including shoes and rigging on the
trucks. There's also a delicate molded brake hose and coupling, and tiny coupler
cut levers. A close examination of the trucks reveals a couple of surprises. The
metal wheelsets have rotating roller bearing end caps, just like the real ones.
The wheels feature narrow-tread tires, the .088" wheel now being espoused by
freight car modelers, and they look great.
Painting People
There are a few quick tricks to painting people for trackside scenes. When
painting HO or N figures, detail is difficulty for all but the very experienced.
For layouts, you don t have to make each one a masterpiece. Here are a few
tricks of the trade:
Colors: the pros have learned that when painting people, flat colors are best.
You can find sets of flat paints that have a good, basic inventory of colors. We
used to use military flats by Testors. The set included desert tan, which made
for a good flesh tone. People do not dress in the same colors one might use for
model cars. There are a lot of dark and subdued colors, such as dark brown, dark
green, olive green and dark blue. The blues are useful for anything from
uniforms to blue jeans and coveralls.
The technique: take each figure and paint the basic color. Figure it like this:
what does a person put on first? Jeans come before overcoats, so paint the jeans
color first. Let the figure dry, and then come back and paint the overcoat a
dark brown. After the clothes, paint exposed skin: hands and heads. When the
head dries, a spot of paint on top of the head and running toward the back
serves as hair. Even if the figure wears a hat, some hair is usually exposed.
When the hair dries, paint the hat, shoes, and any special equipment like
mailbags or backpacks.
You don t have to paint belts. They are too small and usually aren t noticed.
unless you have real skill, leave it alone! A mess is worse than no belt!
To finish, add any special extras. A drop of gold or yellow is a badge for the
policeman; a dip of silver or light grey is the symbol on the conductor s hat.
Just make a quick dab with a toothpick to apply these specials. Don t paint
buttons! They are too small and would not be noticed.
Uniforms: there are several basic uniform colors in the US. For figures working
in any of these fields, begin by painting them the uniform color.
Uniforms:
Dark blue: police, railroad conductors and porters, firemen, auto mechanics.
Dark green: maintenance men, landscapers
Grey: postmen, crossing guards
Brown: sanitation men, track gangs, delivery men
White: hospital personnel, cooks
Camouflage: Army and Marine personnel
Shoe colors:
Black: police, railroad conductors & porters, firemen, postmen, crossing guards,
cooks, delivery men, military personnel
Brown: Maintenance, mechanics, outdoor workers.
White: hospital personnel
Special hats and headgear (usually headgear is the same color as the uniform.
These are a few exceptions):
Military helmets: camouflage or olive green
Construction helmets: red, orange or yellow
Motorcycle and mounted police helmets: white or pale blue, with black brim
Bikers: bikers mainly wear black, red, blue or white helmets
Railroad porters: red caps with black brim
Firemen: older helmets were black; modern helmets are yellow. The chief wears a
white helmet.
For uniformed figures, paint the entire figure in the uniform color and let dry.
Later, come back and paint the shoes the appropriate color. Paint hands and
head. When head dries, paint a splotch of hair on back. Later, come back and
paint headgear the uniform color.
Street clothes: if you watch people, you ll notice that very, very few wear
bright colored pants. White pants are only used by medical personnel and cooks.
Many wear blue jeans, which can be painted in a pale or dark blue.
The jackets worn in Fall and Spring are usually simple colors. Bright colors are
rare. Jackets are normally subdued darks and lights, but not brights. The same
goes for shirts and blouses. White shirts and blouses appear from time to time,
but most people wear other colors.
Overcoats, raincoats and winter clothes are normally subdued earth tones.
People color: one rarely sees a town where people are all the same color. Even
in towns which are predominantly one ethnic group or race, you still see other
groups. Reflect this in the figurines you paint. A little diversity goes a long
way toward realism.
For Whites, use fleshtone. Vary hair color. Half will have brown hair. The rest
will be blond (yellow), red (orange) or raven (black) haired. Use brown with
black hair for African Americans. For Asians, use fleshtone with black hair. You
only need a little diversity for realism.
MIXING DIRT PAINT
The "pigments" are very fine. I mix them with other rock powders to
change the overall color and to vary the strata in rocks. I mix the
powder colors with white glue and wet water (The correct ratio is the
one that works for you), and just treat it like paint. The powder tends
to settle out, so you'll have to stir it with each brush load, but that
becomes almost automatic. Another trick is to occasionally pick up some
of the "paint" without stirring it first to vary the colors.
I usually mix several batches at once and vary the pigment to powder
ratio to obtain my strata colors, starting with the lighter colors and
working my way to the darker shades and especially shadows.
If it's going to be a forbidding rock face, I may give it an India
Ink/alcohol wash first for background, then use something like Gray
Granite Powder. The India Ink wash darkens it enough that Black Pigment
usually isn't necessary. At the top of the cliff, I'll mix in some White
Pigment and make it thin enough to run down the face. It gives the
impression of lime deposits deposited by runoff.
On flatter surfaces, I've had pretty good luck by painting it with my
earth color first, then applying the powder/pigment "paint" after it
dries.
Mother Nature's colors and textures are anything but even, so use
variety on your layout...
Well, in John Pryke's "Building City Scenery" (published by Kalmbach), he
discusses embedding tracks in the street.
First, he lays the track, painting the area under the rails (on the roadbed)
black, to prevent the roadbed from showing thru the flangeways. He uses
posterboard for the street outside the gauge, and .020" styrene for the pavement
inside the gauge (between the tracks - leave 1/16" gap on either side for the
flangeways).
Both the styrene and the posterboard are glued to stripwood to bring them up to need track height, BTW. then he fills and sands all seams using putty - while he is modeling concrete streets, with the smooth surface left at this stage you could model asphalt roads. He goes on to carve expansion joints and the such, necessary to mimic concrete for his layout (which models the Union Freight railway of Boston).
Anyway, the switch question - he used styrene sheet as mentioned above, and he
cut out the pieces to fit his turnouts within the parameters above (1/16
flangway), except he left a larger than normal gap at the points so that the
switch would indeed work (in other words, the gaps were big enough to clear the
points in both the straight and diverging positions).
Yep, these gaps do look kinda big, so he paints the inside of the switch points
black (except where electrical contact is needed) to make the gaps seem smaller
- and it works.
One thing I didn't see him mention - he cut small slots over the throwbar (between the points) so he could reposition the switch, with a rod of some time. I suppose you can use switch machines mounted under the layout just as well - make sure you keep the throwbar free (don't glue and styrene or strip wood to it. If you gonna have several turnouts of the same type, he recommends making a template.
I suppose if you use white glue for attaching the stripwood, roadbed, and
pavement together, then it would be possible to pry up the street to do
maintenance.
FMC Itel
McCloud River
Series 300000-300499
Former Number N/A Former Series N/A
Built 8/78 Rebuilt N/A
Car Manufacturer FMC Location Portland, OR
Lot Number Unk Plate C
AAR Class XM RR Class B209
IL 50-6 IW 9-6
IH 11-2 Door Style YSD 6/6/6
Door W 10-0 Door H 10-5
Cuft 5295 Ld Limit 158,300
Truck Unk Wheel Diameter 33"
Hand Brake Unk Date Painted 8/78 (New)
Photo Location Coos Bay, OR (SP) Photo Date 12/78
Photographer Mike Clark Remarks
Resources Commodity
History of Cloud River Railroad: Part VII
1977-1992:
The Itel Years
The middle 1970’s were marked by a shortage of boxcars in the railroad industry.
When one railroad uses a railcar belonging to another to transport freight the
user road pays a per diem charge to the owning road for the use of the car. The
McCloud River had always relied upon cars belonging to other roads to move
freight in. Owning a fleet of cars would provide some revenue in the form of per
diem paid to the owning road while the cars are elsewhere, but more often than
not the per diem rates were to low to make car ownership feasible for small
companies, especially during times of plentiful car availability. The railroad
had investigated the possibility of purchasing it’s own interchange freight cars
in the past, but the anticipated return on investment did not make purchasing
such cars worthwhile. The boxcar shortage and the resulting spike in per diem
rates change the situation for small railroads.
Many shortline companies like the McCloud River saw gold in the boxcar shortage,
but very few of them had the readily available capital to purchase fleets of new
boxcars outright. A small group of leasing companies appeared on the scene to
provide boxcars to the shortlines. Before long dozens of shortlines that had
never owned a single interchange freight car in their histories had their names
on sometimes thousands of new boxcars in service across the country.
Itel was one of those leasing companies. The company was founded in 1972 under
the name Environmental Leasystems Corporation. Itel specialized in owning cars
which it leased to third parties (at it’s height Itel owned about 70,000
railcars), rolling stock repair facilities, and ownership of shortline
railroads. Itel’s first railroad was the Hartford & Slocomb Railroad, a 22-mile
long railroad in Alabama purchased in 1975. Itel’s next road purchased was the
McCloud River Railroad, acquired in 1977. In December of 1997 Itel purchased the
Green Bay & Western Railroad, a regional paper hauling road located primarily in
northern Wisconsin. The Ahnapee & Western was added in one of the two 1977
transactions. The Ferdinand & Huntingburg Railroad of Indiana was purchased in
1983, and the company expanded again in 1988 with the purchase of the Southern
Railway of British Columbia and the creation of the Fox River Valley Railroad.
All of the railroads purchased by Itel were previously existing companies except
for the Fox River Valley, which was created to operate a group of branchlines
purchased from the Chicago Northwestern.
Itel purchased the McCloud River primarily because it was a major source of
boxcar traffic and because it had a large shop capable of making repairs.
Champion-International was receptive to an Itel offer, and the transaction was
finalized in 1977. The new ownership had little effect on the day-to-day
operations of the road.
One of Itel’s first moves was to provide the McCloud River with it’s own
boxcars. A total of four hundred new boxcars were purchased in mid-1977 for the
road. The cars were built by FMC Corporation in Portland, OR. The cars were
white with brown ends, doors and lettering. These cars were used to move some
freight on the railroad, but were primarily used produce per diem revenue while
in operation on other railroads. The McCloud shops became the home maintenance
base for the cars, and through time additional boxcar fleets leased to other
western shortlines by Itel were assigned to the McCloud shops for maintenance.
Unfortunately for Itel, the late 1970’s and early 1980’s were very rough times
economically for the timber industry.
Adjust ink printed to decal. Look for premium semi-gloss, or glossy photo
quality paper. Higher contrast and reduced brightness prevented fade.
Misc. RR Dates
ACF scan label 1968
C Lube Plates 1972
Plate B 15'
Plate C 15' 6"
Plate E 15' 9'
Plate F 17'
Spacing between A&B units is approx 16-20"
3-6 Bay Cyl hoppers 1961 ACF sand,clay, salt, grain,plastics First centerflow
design.
ACF pressure hopper 125 ton trucks 38" wheels cement 1964-66
Coal car ends painted for rotary in early 1960s
Waffle cars late 1960s -1970s, SRR 1974-78 3,725 deliverred
10/16/55 Last steam run on LIRR
Ford C-series trucks 1957, 62-87 single headlights, FORD below windsheild <1983
CP Multimark "Pacman" emblem late 1968
50 ft Combo Door boxcars first introduced? C. 1955 built by UP By 1957-1960
there
were many railroads buying them.
SIECO exterior post plate C 50’ boxcar production in the early 1970’s with
several
class one railroads as well as independent per diem short lines. 30+ years
service.
GN Big Sky Blue April 1967
RDC-1 was strictly passenger-oriented, containing 90 coach seats - LIRR 3101
RDC-2 contained 71 seats and a separate baggage area - LIRR 3120
RDC-3 combined a RPO with a baggage compartment and 49 seats
RDC-4 was a self-contained Railway Post Office Express car
HO Car Weight
scale feet all weights in ounces 1/2
oz + 1 oz *(car length in inches)
20
2.4
30
3.1
40
3.8
50
4.5
60
5.1
70
5.8
80
6.5
Scenery
Tricks & Tips
Scenery Power Tricks for Added Effects
Here are a few little tricks to give your diorama or layout added appeal. Try
them, and see what they do for you!
Association: we associate certain things with certain professions and
activities. By using this mental habit, it is possible to add life to a scene.
The concept of association is simple, but it packs a lot of power.
Hospital: have the ambulance at the Emergency entrance. Place two or three
people painted with white clothing near the entrance. We associate white outfits
with hospitals. By placing the right people there in the right colored clothes,
you put a slice of life in your layout. Note that the folks going in and out the
front entrance normally wear regular clothing.
Police station: there is usually a police car or two outside the station, and a
couple of officers hanging around by the entrance. Police stations are rarely
scenes of frenetic activity.
Fire House: firemen use their spare time maintaining equipment. Have figures
painted in blue uniforms polishing the truck or lining up fire hoses outside the
building.
Lackawanna Platform: except in one-horse towns which get two trains a day, there
s usually a schedule of trains heading for several destinations. Some folks are
waiting for a later train, and some are rushing for the train that s due in
three minutes. Have a mix of seated persons, standing figures, and people
walking to an from the platform. Place some boxes on the platform at one end,
and if possible, include a man with a hand truck. Don t forget a trash barrel on
the platform!
Post Office: most folks headed in and out are customers. You can have one
postman headed out of the building. Have a post office vehicle parked by the
back door.
Bungalows: you can buy plastic fences at a hobby shop. Fence in the yards. For
added life, have a postman making his rounds. A man pushing a lawnmower also
adds to the picture. You can make the lawnmower from scrap plastic.
Truck yards: Have a tractor trailer or two backed up to the loading dock. Have a
couple of trailers without tractors backed up, too. Park one tractor on the
side. Cut a square of dark paper and paste it to a figure to look like a
clipboard. He should be on the loading dock beside an open trailer. Add hand
trucks and a forklift for added effect, plus boxes, crates and barrels.
Restaurant: A common sight is the cook and waiter taking a smoke break in back.
You can also place a busboy in back emptying trash into a barrel or dumpster.
Boat shop: wouldn t it look nice to have a pickup pulling a boat on a trailer
parked outside this shop?
Army base: military vehicles are always parked properly. Have a couple of
soldiers walking about. To camouflage them, paint their uniforms green, and then
add tiny splotches of brown and tan. The man in the guardshack can wear dress
uniform.
Business street: along the street, there will be various people carrying
packages. A woman with a stroller is a common sight. Normally, when there are
several shops, at least one will be receiving a delivery. Behind the fish store,
there will usually be cats waiting for scraps.
Railside Diner: among vehicles parked outside the diner, include a police car
and a utility truck. Diners attract working folks, and those with the best food
attract local police and truckers. Make your diner look like a working Joe s
place.
Momo s Pizza: a couple of tables outside, cafe style, add to the effect. If you
make beach umbrellas for the tables, make then red, white and green for a
pizzeria.
Joe Garage: along with gas pumps, make a simple air pump. Leave some tires lying
alongside the building, and perhaps a battery or two. Park a tow truck alongside
the building. Don't forget to leave a gas can or two around.
Painting People
There are a few quick tricks to painting people for trackside scenes. When
painting HO or N figures, detail is difficulty for all but the very experienced.
For layouts, you don t have to make each one a masterpiece. Here are a few
tricks of the trade:
Colors: the pros have learned that when painting people, flat colors are best.
You can find sets of flat paints that have a good, basic inventory of colors. We
used to use military flats by Testors. The set included desert tan, which made
for a good flesh tone. People do not dress in the same colors one might use for
model cars. There are a lot of dark and subdued colors, such as dark brown, dark
green, olive green and dark blue. The blues are useful for anything from
uniforms to blue jeans and coveralls.
The technique: take each figure and paint the basic color. Figure it like this:
what does a person put on first? Jeans come before overcoats, so paint the jeans
color first. Let the figure dry, and then come back and paint the overcoat a
dark brown. After the clothes, paint exposed skin: hands and heads. When the
head dries, a spot of paint on top of the head and running toward the back
serves as hair. Even if the figure wears a hat, some hair is usually exposed.
When the hair dries, paint the hat, shoes, and any special equipment like
mailbags or backpacks.
You don t have to paint belts. They are too small and usually aren t noticed.
unless you have real skill, leave it alone! A mess is worse than no belt!
To finish, add any special extras. A drop of gold or yellow is a badge for the
policeman; a dip of silver or light grey is the symbol on the conductor s hat.
Just make a quick dab with a toothpick to apply these specials. Don t paint
buttons! They are too small and would not be noticed.
Uniforms: there are several basic uniform colors in the US. For figures working
in any of these fields, begin by painting them the uniform color.
Uniforms:
Dark blue: police, railroad conductors and porters, firemen, auto mechanics.
Dark green: maintenance men, landscapers
Grey: postmen, crossing guards
Brown: sanitation men, track gangs, delivery men
White: hospital personnel, cooks
Camouflage: Army and Marine personnel
Shoe colors:
Black: police, railroad conductors & porters, firemen, postmen, crossing guards,
cooks, delivery men, military personnel
Brown: Maintenance, mechanics, outdoor workers.
White: hospital personnel
Special hats and headgear (usually headgear is the same color as the uniform.
These are a few exceptions):
Military helmets: camouflage or olive green
Construction helmets: red, orange or yellow
Motorcycle and mounted police helmets: white or pale blue, with black brim
Bikers: bikers mainly wear black, red, blue or white helmets
Railroad porters: red caps with black brim
Firemen: older helmets were black; modern helmets are yellow. The chief wears a
white helmet.
For uniformed figures, paint the entire figure in the uniform color and let dry.
Later, come back and paint the shoes the appropriate color. Paint hands and
head. When head dries, paint a splotch of hair on back. Later, come back and
paint headgear the uniform color.
Street clothes: if you watch people, you ll notice that very, very few wear
bright colored pants. White pants are only used by medical personnel and cooks.
Many wear blue jeans, which can be painted in a pale or dark blue.
The jackets worn in Fall and Spring are usually simple colors. Bright colors are
rare. Jackets are normally subdued darks and lights, but not brights. The same
goes for shirts and blouses. White shirts and blouses appear from time to time,
but most people wear other colors.
Overcoats, raincoats and winter clothes are normally subdued earth tones.
People color: one rarely sees a town where people are all the same color. Even
in towns which are predominantly one ethnic group or race, you still see other
groups. Reflect this in the figurines you paint. A little diversity goes a long
way toward realism.
For Whites, use fleshtone. Vary hair color. Half will have brown hair. The rest
will be blond (yellow), red (orange) or raven (black) haired. Use brown with
black hair for African Americans. For Asians, use fleshtone with black hair. You
only need a little diversity for realism.
Animals
There are tricks for painting livestock and other animals. It doesn t take much
to impart some heavy- duty realism here!
Black parts: almost all animals have black hooves and black noses. There are
exceptions. Horse, pig, and cat noses are not black. Dogs, cats, rabbits and
ruminants don t have hooves. Most animals have dark brown or black eyes. For
general animal painting, the black hoof / black snoot is convenient, with
exceptions noted above.
Horse white: Most horses are shades of brown, a few being pure black or pure
white, and a small scattering of palominos blonde and pintos spotted. Except for
white, black and palomino horses, you can paint their manes and tales either the
body color or black. And with the same exceptions, a simple trick to make a
horse look realistic involves putting a dab of white paint between the eyes and
running toward the nose. Many horses have this star.
Piggie pink: most pigs are white, with a few black and a few spotted. White pigs
are actually a very dull grey, because they re filthy. The snout is always pink.
Cow spots: Cows are generally spotted black and white, with a few all- black or
all-white, and a few browns and brown spotted.
A pen can be made of plastic fence. Hogs are always penned. Livestock pens are
common at trackside in places where there s a cattle trade. The inside of any
animal pen is usually pure dirt. No vegetation grows there. Pens are normally
free of rocks. Remember to add gates or ramps as needed.
Make an Army Base
Army buildings are generally painted white with green trim. They are usually
arranged in order. To turn these buildings into an Army base, the key word is
uniformity. Add a few military vehicles, such as ROCO Minitanks or other HO
Scale vehicles. If you re doing the current military, remember that vehicles are
painted in camouflage patterns and that the US no longer uses the jeep. For
earlier eras, say from 1950 to 1985, jeeps will be prevalent.
Prior to 1980, most military vehicles were painted a standard OD green. Only a
few were camouflaged. Soldiers wore olive drab fatigues.
An Army camp is not a gun-o-rama show. Most guns are out of sight in arms rooms.
The only appearance of firearms might be a soldier on guard duty. In a peacetime
setting, very few soldiers will wear helmets. The fatigue cap is the headgear of
choice.
Military installations are characterized by order and neatness. Keep that in
mind if you add an Army depot to your layout.
Flora: Plants and Shrubs
In designing your layout, you have to consider two kinds of plant life: wild and
landscaped. Plants make a difference. The nice thing about lichen is that it
gives you all kinds of plants at a low cost.
Hotel Hoboken: if this is supposed to be a good hotel, a small hedge or tree
outside can help.
Trees: get a twig and place lichen on it. This is an inexpensive tree. Make a
base of cardboard, paint it, and don t forget to paint the tree s roots on
there!
Hedges: Instead of a fence, make a hedge of lichen around one or more houses.
Church: churches normally have some kind of plant, hedge or bushes planted
outside.
For Advanced Modelers
Experienced model builders won t want to give up plastic kits. They don t have
to. With PC WhistleStop, they can use computer technology to enhance their train
layouts.
Backdrops and skylines: for way back on your layout, you can make a facade of
building fronts using PC WhistleStop. Just print normally and cut the facades
free, then paste them where you need them.
Interiors: By trimming, you can use PC WhistleStop walls to make interior walls,
woodwork, etc. It s like having scale wood paneling and brickface.
Scenics: In places where space is at a premium, you can cut the plate glass
windows from these buildings and insert them behind open windows.
Filler: until you find the plastic kit you need, use a PC WhistleStop edifice to
fill that space on your layout. Nobody need know that it s a printed paper
house!
Power Draw Techniques
Our buildings open in CorelDraw somewhere between HO and N. Use your computer
program to resize buildings to a new size. Click on the image, and six boxes
will appear around it. Take a corner box and drag it, so that the entire
building is structures accordingly. Push into the image to make it smaller, and
pull out to make it bigger.
If you know how to use a Draw program, you can Ungroup each image. Select a door
by scoring around it with the pointer tool. Six boxes will appear. You can
enlarge or shrink the door to suit whichever scale your prefer.
Don t like the building s color? In CorelDraw, after Ungrouping everything,
select the wall panels. Click each in sequence as you hold down the Shift key.
Then, open the Fill tool. Go into the ... Menu. Click on the dotted image, and
other designs will appear. Choose from the brick or line patterns. Click twice.
Now, you will see the new pattern. To the right are the colors. Select Back for
a new overall color. Exit, and your building will be the new pattern and color.
Don t like our signs? Ungroup, and then remove them. Or remove the lettering and
place new lettering of your own, using Artistic Text. Choose a fill color. Using
the Pen tool icon, choose an outline color for your new sign.
We offer a full range of trackside figures, animals, street scene items, park
items, signs, non-operational signals and other goodies to enhance the PC
WhistleStop! structures. The enclosed catalog will tell you what we have so you
can add the finishing touches to your scenery.
This manual is to supplement the regular PC WhistleStop! documentation.
Our Seaside collection is based in structures found on Staten Island's South &
Midland Beach area, the Jersey Shore (Belmar, Avon-by- the-Sea, Spring Lake &
Bradley Beach) and Long Island. We have done our best to faithfully reproduce
the kind of structures found in seaside regions. Our #4 Module will provide you
with an attractive shore scene, complete with bungalows, motels, concessions and
boardwalk. We have also given instructions for a marina and fishing pier.
The accuracy of this set has a lot to do with the designer s own seaside
experiences. He saw the summer fun, and also had business down the shore in the
off season. Having learned the peculiarities of seaside life and business, he
has brought together this unique assortment of shore structures. You will notice
the pastel-colored buildings, for instance. It s all part of that strange
anomaly called the Shore, be that the old Staten Island s Midland Beach, the
Jersey Shore, Long Island or old (pre-Casino) Atlantic City.
Motels: there are two ways to make them. For a single story motel, use the front
panel with doorways and the back panel attached to a sloped roof. We suggest
overhanging the roof to make a covered walkway (see manual). Make two or more
peak roofed motels and place them together in an L formation. The office can be
the lead building.
For two-story motels, cut the angled panel off the front panel and replace it
with the loose level panel. For the back, use the back panel with level side
panel. Make a plain roof and overhang one to two inches. Now, make the second
story using front and back panels with angled side panels. Overhang the roof 1/8
to 1/4 inch more than the overhang of the first floor.
Add stanchions. The top floor stanchions should be a continuation of the first
floor. This leaves a 1/8 inch overhang. This method provides a walkway on the
second tier. A simple guardrail can be made by using thick thread tied tightly
between stanchions and then painted. You can also use plastic scrap or the MPC
brand black iron fencing, trimmed to waist height.
Make a stairway at the end of the upper walkway. You can also make the L shape,
but you may have to add a piece if there s a gap between upper walkways. This
kind of two-story motel was common in Asbury Park and surrounding towns as far
south as Belmar.
Lean-tos: cut as shown. Fold the outermost panel inward on both sides. Fold the
central upside down panel down. Now fold the outside panels normally. This gives
you a stand with an interior. One interior has t-shirts and other seaside gifts;
the other has a cooler with soda bottles. As most workers in these places are
marginally uniformed, they might wear a shirt and cap of the same colors.
Ice Cream Stall: on the front, cut the three sides with the solid line. Pull
out, folding sharply on the dotted line. This makes a handy counter top. Inside,
have a figure in white attire placed as close to the open window as possible.
Counter: the counters can be folded as shown and placed just inside the opening
of the lean-tos.
Tables: fold the legs once, and then pry out the front sections along dotted
line. This makes a simple tripod. Glue or tape tabletop. For added effect, stick
small dowel, thick wire or toothpick through center of the tabletop. Place an
umbrella head on top. These snack tables go well around the snack bar and ice
cream parlor. They also go well around the pool and at the motel.
* If you use miniature street items, don t forget to put a trashcan beside the
snack bar and ice cream parlor. And have a mailbox near the gift shop.
Boardwalk: Tape each wood panel section to the next. Fold legs and place
underneath. Use the end panel at the end of the boardwalk.
* For a better effect, use dark stained wood dowels in place of paper legs on
boardwalk and piers.
Marina: Use boardwalk panels for the main pier. From it, have at least one side
pier on right and left. Use the thinner panels. The smaller sub-piers are
floating panels; the main pier is usually supported by legs. Use dowels under
the main pier.
* Shops that cater to model boat builders sell the various items to which a boat
will tie up. These can add a touch of realism to your pier.
Fishing scene: Use boardwalk panels for pier. When you use dowels, have the two
on the far end of the boardwalk protrude through it about 1/4 inch. These
protruding ends should be weathered. Prior to staining the wood, file the ends
so that they are rounded and smooth. Add a few notches, etc. Next to this pier,
have a floating pier piece running parallel. A small piece of ladder should be
fastened to the main pier alongside the floater. Some piers have floaters on one
or both sides, running the length of the pier. A life preserver can be tied to
the side of the main pier or two one of the protruding posts.
* Have a bundle of netting at the fishing shack. You can make fishing floats by
using small green or blue glass beads. Fishing floats in real life range from
the size of a softball to that of a basketball. Most are covered with thin
netting. Other tools include boat-hooks, nets on poles, various hooks and gaffs,
rope and a few chains. There are always two or three rowboats. For added effect,
have a rotting, falling-apart rowboat among the items. If you re doing New
England, make a couple of lobster traps to leave alongside the shacks.
Lighthouses: have these on shoreside or on a shoal. You can cover the window
part with colored cellophane to get a window effect. A bungalow alongside the
lighthouse can be the lightkeeper s house. Have a freshly- painted rowboat
alongside, too!
Lifeguard s chair: make legs of dowels or thin plastic. The lifeguard chair
ought to be twice the height of a figure.
Protected swimming: use small beads, and paint them red on one half and white on
the other. String them an inch or so apart on tan thread. There is usually a
pile of this by the lifeguard s chair or shack. Likewise, these are floating in
the ocean to demark a protected swimming area. They are tied to stakes on top of
the beach. The demarked area is always rectangular.
* Sharks! Have a fin protruding above the water. The lifeguard will be standing
on his chair, in an action pose, and people will be running away from the water.
Have a couple of figures picking up children as they run. Mothers and fathers
instinctively grab the kids when fleeing danger. Others will stand well away
from water, staring at the shark. (I ve seen this actually happen a few times!)
* Beached goods. Anything from a weird boat to a torpedo to a whale. People
stand around in a small crowd gaping at whatever cute thing washed up. Usually,
there are some kind of experts actually working on the thing. If it s a whale,
the Federal parks people are usually involved. For a torpedo, it s cops and the
bomb squad. For a boat, it s the coast guard or the cops. Note that folks will
be kept well away from a torpedo or mine, and police will erect some kind of
barricade.
* Naughty! Fishermen are likely to be found under bridges, but what s under the
boardwalk? Of course, there are the hoboes and beach bums who pursue their
libations and make their homes there. Then there are the amorous couples under
the boardwalk. Those with a risque sense of humor might consider the options.
* Dive! When divers operate, they use a float that displays the diving flag.
This little item is always present with divers.
* Jetty. A jetty can be made of gravel. The top is normally flat, and is the
abode of surf-casting fishermen.
* What about fishermen? Fishing is more than a rod and a reel. You need a tackle
box, a bucket for the catch and a cooler for beer or soda. Fishermen usually
come in teams: husband and wife team, family team, guys from the lodge, etc.
While two or three are fishing, one is sitting it out and another is poking into
a cooler or tackle box.
* Miniature golf. The most popular golf at the shore. Most players are families
and couples. Easy to make: just place out fairway cutouts on green paper and
enclosed the area with plastic fence. There will be an admission booth with golf
clubs. Miniature golf targets can be made from miniatures and toys. There s
always a small windmill. Use your imagination here. Lights are strung over the
course because folks play well into the night.
* Lounge chairs. Make a frame of thick wire in a rectangular shape. Bend to be a
chair or chaise lounge. Glue a strip of paper for the actual seat. Make legs of
wire or scrap plastic. These are popular at poolside, at the motel and high up
on the beach. There are always a few people on chaise lounges working on getting
a tan. Have a cooler or kit bag alongside.
* Barbecue: have lounge chairs and umbrella tables around. Cut a drinking straw
into a 1/2" length. Now split it lengthwise. A crescent- shaped piece of paper
on each end makes a half-drum. Paint it black. Mount on legs. For coals, use
fine gravel painted red. The grill can be made from scrap plastic. Cut out
burgers from light brown paper, hot dogs and steaks from red paper. One fellow
invariably tends the barbecue. Have one table nearby with stacks of plates,
burger buns, etc.
* Paper plates: the disks created by a simple hole-puncher for looseleaf paper
will make great paper plates! They can also be painted to use as hubcaps, trash
can lids, hat brims, etc.
* Yes, hat brims for beach hats. Just poke a hole in the center and put on a
figurine s head. Paint it straw color, and voila! Instant sun hat!
* People are more prone to use bicycles and skateboards at the shore. Have a
bike rack near the boardwalk. Make it from scrap plastic.
* Color me seaside. At the shore, people wear brighter colors than at home.
There will be fewer dull colors - a direct contrast to everyday life in town or
city.
* Mini-Community. Most layouts and dioramas have space limitations. To catch the
flavor of the seaside accurately under these conditions, try our 3-block plan.
At the edge is the beach, complete with boardwalk. A two-lane street runs
parallel to the boardwalk. Across that street are the motels and bungalows and
seaside-type shops. That s the first block. The second parallel street has the
regular main street shops, like our Town & City collection. It also has the
homes of permanent residents. The next block is the train station, and around it
will be roadside shops and a parking lot. By combining Seaside with Town & City,
you can make a good representation of a shore town. Across the track would be a
couple of light industrial buildings, such as a loading dock or two and maybe a
small warehouse. Keep in mind that although shops are town, folks are still at
the shore and will dress accordingly. No dull clothes here! Everything serves
the shore.
* Most seaside businesses do all their sales between May and mid- October. They
rely on the seasonal guests. When the season ends, most close for the remainder
of the year. The concession stands and sea-sport shops would close in Autumn, as
would one of the motels and perhaps half the bungalows. That means windows are
boarded up with sheets of white plywood, and notices such as Will reopen May 1st
or Closed for the Winter. From Autumn to Spring, local dress in dull everyday
work clothes colors. Bright clothes are only for summer.
Stanchions & Foldovers
The Pier stanchions of Seaside, the Platform pilings of Industrial and the
Modular Fort Wall of Wild West have a unique feature to allow a 3D effect. Cut
stanchion or wall loose, and fold as shown on the actual printout. Fold so that
uncolored sides are abutting and glue securely. This gives you a 3D piece
printed on both sides with the additional strength of having a double thickness.
For more strength, fold over a piece of thin plastic or cardstock.
Roadside & Seaside Stands
For stalls included in Farm Country and SeaSide sets. Fold the outside pieces
(marked with letters on the printouts) over the adjoining section, uncolored
sides facing and colored sides visible. Fold the extended panel down over the
uncolored side. Glue securely. This leaves a center panel and two side panels.
Fold side panels forward, making a squared U . Place a roof on top, and you have
a roadside stand with full interior. Fill interior with miniature goods, a
counter and a counterman. This same procedure is also used on the fishing shacks
in SeaSide
Industrial Set Addendum
The Industrial set is a miniaturized version of trucking depots, loading docks,
old factories and other buildings found around most Northeastern cities. They
make great trackside accessories! There are some twists to the Industrial
collection which you don't find in the others. Here s the deal:
On girder bridges, fold the steel parts so that colored parts show on both
sides. Glue securely, then trim away that white between the girders. This makes
a more realistic bridge. Use a sheet of grey or black paper for roadbed; past
tabs underneath roadbed. On the bridge with concrete supports: glue supports
under roadbed.
Factories have a small porch roof for the extended sides. Overhand one or both
to build a lean-to covered area or even a covered loading dock on the side.
The module pier / platforms work just like the boardwalk sections of SeaSide.
Use them to build extra platforms.
Wild West Addendum
We based the town on a lot of things. You can enjoy a LOT of variety, and can
customize for all sorts of variations on the Western theme. It is possible for a
creative person to build entire towns, ranches, cavalry forts, mining camps,
etc. Wild West boom Town has a few twists of its own. Among them:
You can cut the Fort s wall panels into inch-wide laths. Use these to make the
wooden sidewalks of the town. They can also be used for awnings.
Using techniques described in our basic manual, add awnings and covered
walkways. It is usually best to use the method of gluing the awning to the face
of the building, just below the signs.
For the Hotel, use plastic picket fence for a railing around the two lower
roofs. Have one overhang from the main roof that covers the lower roof; a second
overhand starts at the base of the railing and hangs over the front entrance.
To build the fort, fold wall panels over one another, colored side out. Fold the
first, securing the tab end. When you make the second panel, fold it over the
tab of the first. Continue until a whole wall is done, finishing by inserting
the last tab into the first wall segment. You can build the fort as long as you
want. If you must trim a wall section, trim from the untabbed end. Use added
section as the walkway inside the wall.
The gate section can be trimmed with gates opened or closed.
For Western scenes, use rustic fencing to make corrals, hitching posts, etc. You
can make very good street items (watering troughs, etc.) using standard model
railroad scenery. Add ladder as you wish.
We are very happy to bring you this information . It is our sincere hope that
your trackside scenery and dioramas will have the kind of accuracy you desire.
To that end, we continue to develop PC WhistleStop! .
PC WhistleStop! - More Good Ideas!
Farm & Country
Pay Phones: many roadside stores and rural depots have a pay phone on the
outside wall. They are also popular places for mailboxes. If you make a scene
with someone using the pay phone, remeber to have his vehicle parked nearby. In
rural areas, pay phones may also be attached to telephone poles.
White Farm: use green roofs for these buildings.
Horse Stable Farm: Use red or brown roofs. Make a corral from fences. When
making the Stable Roof, let it overhang 1" to 2". Fold the overhand so that it
paralells the ground. On both ends and in the middle, place a stanchion. You can
make it from scrap plastic or small dowels.
Bus Depot: a couple of benches alongside the building work well. So does having
a soda machine and newspaper vending machine outside. If one side of the
building is a waiting area, make an awning.
Sheriff: Rural police departments use sedans and four-wheel-drive vehicles. It
might pay to have an ATV parked outside the building. Most county and many rural
police wear uniforms in colors other than blue. Try for brown, grey or green
uniforms. Rural police favor wide-brimmed hats and baseball type caps.
General store: have a small newspaper vending machine outside the door.
Deliveries to rural stores are usually made by large vans rather than full-
scale trucks.
Country Church: most country churches have a cemetary in front or adjacent.
These are fenced in with wrought-iron fences. Country churches usually have a
small meeting hall in a separate building.
Clambakes and festivals: festival gatherings are common in rural areas. There is
usually a long canopy tent where food is prepared and served, and numerous
picnic or folding tables lined up together. These events are usually packed.
Some folks will be seated at tables, others on the chow line, and still others
playing games. Include a small band.
Flea markets: outdoor markets and fairs are common. They are well- attended, so
have plenty of figures and plenty of cars in the parking lot.
Trailer parks: no paved roads here! Expect dirt or gravel. Long-term trailer
dwellers erect porches, overhangs and awnings. The area around their trailer is
home, so expect potted plants, maybe a small garden or a sandbox for the kids.
In rural areas, it is not uncommon for a solitary trailer to serve as a home on
a five-acre spread.
Industrial & Railroad
Slob zones: Industrial areas are hardly paragons of cleanliness. Old debris can
be scattered about alongside buildings. A few full trashcans along the wall adds
to the effect.
Roach coach: lunch wagons are a staple of factory work. For added realism, have
a roach coach outside a factory, and a line of people. Include a few figures
walking away from the roach coach, at intervals. They would be carrying bags of
food, containers of coffee, etc. No more than two people will be walking away
together. Remember, it takes time to serve each customer, which accounts for the
intervals.
Ye olde clipboard: on every loading dock and platform, there s the fellow with
the clipboard. You can make a clipboard with a sliver of brown paper or plastic.
Paste a small piece of white paper on this, and paint on a thin line of silver
where the clip would be. The clipboard man adds realism to loading docks and
industrial sites.
Skid rows: in older towns and cities, the industrial area is on the outskirts of
town. Workers are only there during business hours. The full-time residents are
skid-row types found hanging around under trestles and in empty lots. In cold
weather, they huddle around a burning trash barrel. These individuals usually
have a hangout where they are found in numbers. Note that skid row types aren t
tolerated in rail yards. They stay away because they are well aware of the
railroad police.
No grass grows: industrial sites are normally covered in raw dirt, asphalt or
trash. There may be an occasional weed or brown bush, but nothing green. Grass
and trees don t fare well around truck yards, factories and maintenance yards.
Dirt: the color of dirt in an Industrial area varies from gravel grey to dull
brown to oily black. You won t find light-tan sand or clean dirt. In truck and
maintenance yards, the ground will be oily. In railroad yards, grey gravel will
be found around the tracks and outer perimeters. In the busy part of the yard,
gravel will be oil-soaked.
Standardization: railroads tend to paint all of their structures in the same
scheme, much as the Army used to paint everything Olive Drab. A repetitive paint
scheme is realistic for all railroad property, from trucks and cars to buildings
and tool boxes. Most large corporations use standardized paint schemes, too.
Shanty office: at construction sites and in many rail yards, an old house
trailer serves as the foreman s office. There is a crude wooden porch, and some
old junk laying about. Normally, a crude sign reading Office or foreman is
tacked to the door. Railyards have been known to recycle old cabooses as
offices. The trucks are removed and the caboose is taken off the tracks.
Shoreside
Colors: shoreside buildings are usually painted in white or pastel shades. Pink
was a favorite. Bungaloes, Victorian houses and boardwalk concessions are rarely
painted in primary or dark colors.
Travel: in Summer, bicycles are more in evidence at the shore than anywhere
else. Though many cars are present, it helps to add more cyclists for realism.
Uniforms? Beachgoers invariably wear swimsuits, while fishermen wear street
clothes. One rarely sees fishermen in swimsuits. At the shore, each activity has
its own unofficial uniform.
Goof: or golf? Miniature golf used to be a big thing down the shore. To make
such a course, use your imagination. It will really add flavor to a seaside
scene.
T. Sheil / Trollwise
PO Box 080437
Staten Island, NY 10308-0005
Copyright 1996 T. Sheil & A. Sheil All Rights Reserved
A B USED CARS
A S SAULTIN BAILBONDS - 24HRS
AARDVARK PEST CONTROL CO
AL KEMMIE SCIENTIFIC PRODUCTS
Ansina Pants Co
ANSON DePANCE INDUSTRIES
ANTSINA PANTS CO
APRIL FUEL CO
ARGYLE MOUTHWASH, "THE ARGYLE GARGLE"
ASKIN LEATHER CO
AYRE'S CHAIRS
BAGGIN ABOXXE FINE WINES
BALDY'S BARBERSHOP
BALL, HITTE & THOREAU SPORTS EQUIPMENT
BARNSTEAD LUMBER CO
BEECHER MEAT CO
BELGO DINGHY CO
BELLE ANN TINES
BELLE N TINES
BELLY ACRES SUBDIVISION
BEMIS-EPPSCOTTI ENTERPRISES
Ben Dover-Proctologist
BERNE BROS FUEL CO
BERRY & RICH BANKING CO
Bill O. Lading's Trucking Co.
BIRMING HAM CO "There ain't no ham like a Birming Ham"
BLACKSTONE COAL CO
BLAND & BLAND SPICE CO
BLOWEHARDE PUBLICATIONS
BLUENOSE REFRIGERATION CO
BOB NAY HORSES AND MULES
Bohr Drilling Co.
Bolt's Hardware
Boltzmann's Fasteners, Inc.
BOYLAN BAGEL CO
BOYLE & DOE BAGEL FACTORY
BOYLE-DINN OIL CO
BRAKEL EGGS
BRINNEL HARD CANDY CO
BROKENDOWNER APPLIANCE CO
BUBBA'S POULTRY - "If It's Fowl, It's Bubba's"
BUCKLEME SHOE CO
BUD WEISER FUNERAL HOME ("The King Of Biers")
BULKLESS WEIGHT LOSS CLINIC
BURL & KNOTT LUMBER CO
BURNDOUT'S WAREHOUSE
BURNHOLT FIRE DEPT
BURNWIDER FIRE EXTINGUISHER CO
C UPA DRESS MFG CO
CANARY CAT FOOD & FEATHER DUSTER CO
CAPE ABLE & PORT ENTIOUS RR
CARR & BUNKLE SKIN CARE LOTION
CARRIE A BASKETTE PICNIC SUPPLIES
CARRYBASKET WHOLESALE GROCERY CO
Carter's Little River Mills
CARTER'S LITTLE RIVER MILLS
CHAPTER 11 PUBLISHERS
CHEATHAM, CUMMING AND GOIN, ATTORNEYS-AT-LAW
CHURCH OF PERPETUAL RESPONSIBILITY
CINDERELLA SHIPPERS ("When It HAS To Be There By Midnight!")
COALBURN'S FURNACE CO
COLDWATER ICE CO
Come On Inn Bar & Grill
COMPANIES
COOK D BOOKES CPA
CRACKER BROS FEED MILL
CURL UP AND DYE HAIR SALON
CURRIER COURIER SERVICE
D CEASTER FUNERAL HOME
DAN D LYONS HERBICIDES
DEE PICKELL'S DELICATESSEN
DELI BUTTON MUSHROOM FARM
Denton Fender, etc.
Dew Drop Inn
DEWEY, CHEATHAM, & HOWE
Dewey,Cheatum,and Howe-Law Firm
DICKER & DICKER TRADING CO
DIGGERS FUNERAL HOME
DILL'S PICKLES
DON TREEDIS SIGN CO
DOOLITTLE MFG
DOWNE & OWLTE DIVISON
DR C U PULLEM, DDS
DR HUGH SMELLUM, NASAL PODIATRIST
DR I N PAYNE, DDS
DR IVA GOLDFINGER, DOCTOR OF PROCTOLOGY
DR LETSA KALMDOWN, PSYCHIATRIST, UPSTAIRS
DR PHIL McCAVITY, DENTIST
DRANE & FIELDS SEPTIC SERVICE
DRIBBLER NO-LEAK FOUNTAIN PENS
DUCKO CEMENT ("We Fix The Quacks In Your Patio")
DULLE & WITTE THEATRICAL AGENCY
DUNMORE ENGINEERING CO
DUNN PROCESSING
DYER FUNERAL HOME
E X PENNSIFF PLATING & MILLING CO
E Z CUPPLER, ENGINEER, RETIRED
E. Castor & Sons Oil Co.
EASTERN DIV OF WESTERLY MAPS AND SUPPLIES
Emerson Bigguns, Corset Manufacturer.
EMMA BEZZLER, HEAD CASHIER
ENDOLINE FUNERAL HOME
ERIE COSTUME SUPPLY
EYTHER ORE CO
FEDUPS FREIGHT CO
FIBBER GLASTON ROOFING CO
FILLMORE DIESEL FACILITY
FINCHBIRD PET STORE
FLASCHEN DEE PAN CO
FLATTE RIBBON CO
FLIBINITE CONSTRUCTION CO
FLUER-DE-LONESOME PERFUMERY
FLUSHINGTON TOILET CO
FLUSHONYA TOILET CO
FLUSHYA TOILET CO
FOR FUTURE FLEEING FELONS" - DELIVERY AVAILABLE
FOR REAL HOMETOWN SERVICE SEE:
FRENDA MINE
FRUNTZ AND BACKUS PICKLE CO
FRYBERN STOVE WORKS
FULLER BEENZ NATURAL GAS CO
GALLOWS ROPE AND CORDAGE CO
GARGLE OIL CO
GATEMAN, GOODBURY, & GRAVES FUNERAL HOME
GEORGUS GORGE
GETZ GAS CO
GIL FINN'S AQUARIUM SUPPLIES
GLACIER GRAVEL CO
GOIE-NUNDER MFG
GOZA-GANSTHA GRAIN
GRABITSKI'S WINTER SPORTS EQUIPMENT CO
GRANNY SMITH'S CIDER MILL
GREEN BAY PACKING
GRIPP'S LUGGAGE
GROSS ASSUMPTION COLLEGE
GUY WIRE ANTENNA CO
HAPPY RHODES MAP CO
HAPPY RHODES TRAVEL AGENCY INC
HARDLEY-ABEL RETIREMENT HOME
HARDLY-ABEL MFG CO
HART-BERN GAS
HARTOOGETOO CONVENIENCE STORES
HISSEN RADIATOR REPAIR
HOLDUR,TYTE & TOSTEPPE RR
HOLINDA FENCE CO
HOLSOM FOOD CO
HONEST JOHN'S USED AUTOS
HONEST OTTO'S USED JOHNS
HORTH PITH BREWERY
HUGH R STARTLED ALARM SYSTEM
HUNKY & DORY, CLAIMS ADJUSTER
HYDE & SEEKUM, PRIVATE INVESTIGATIONS
HYE & DRYE SHIPBUILDERS
I B WILTED PRODUCE CO
I C ARSUN MATCH WORKS
I C NOSTAIN FURNITURE CO
I M FYNE FILE SERVICE - "FYNE'S FINER FILES
I P NICELY GROCERY
ICU MIRROR CO
IMA F RAUD - Palmist
IMMAL PRACTIS MD
INSTANT ANTIQUES - "Antiques Made While You Wait"
IRA KEYLESS PIANO SALES AND SERVICE
Jack Entha Box Co.
JAMES T KIRK ENTERPRISES
JERRY RIGG'S SERVICE STATION
JIM N SIGN, CAPT, USN, RETIRED
JOHN S WIPE PAPER CO
JOHNNY B GOODE ROCKER CO
JUNCKE'S DEPT STORE
KAHN FUSES
KALMBACK AND WAITTE, ATTORNEYS
KATZ MOUSETRAPS
KELLOPOST CEREAL CO
KLAMM'S SHELL STATION
KNOW-GROW SEEDS
KUUK D BUUKS CPA
KWIET RADIO AND TV
KWIET SPEAKER SERVICE
KWIET STEREO AND TV
KYLE O WATT ELECTRICAL SERVICE
L. Case Printing Co.
LARSON E WHIPSNADE
LASTCHANCE FINANCE CO
LAWN RANGER LANMDSCAPING
LAWSON GAINE, STOCKBROKER
Lee-Keye Plumbing Co.
LEEK'S HEATERS (The Best Water Heater: Leek's)
LEFTON FINISHED FURNITURE
LEI-KEI SHIPYARDS
LES S MOORE SERVICE CO
LESHADER GLASS CO
LION STATISTICS & MARKET RESEARCH CO
LITHIUM PHARMACEUTICALS
LIZA C THROU DRESS CO
LONG & SHORT INSPECTION CO
LOS GATOS CHILE CON CARNE
LOSTON FOUNDRY
LOUDON-NOYES MFG
LOWDOWN COAL CO
LUSER SWEEPERS & BROOMS
LYON & NUMBRES, Marketing Consultants
LYTLER & LYTLER ATTORNEYS-AT-LAW
M BURR WAYZA GRAIN CO
M T ARMS HOTEL
MAJOR PROPHETS RELIGIOUS BOOKSTORE
MANGOLD OFFICE SUPPLIES
MARION-HASTE FAMILY PLANNING CENTER
MATT ROVER MINE
McDIRT LAUNDRY SOAP
McKay Funeral Home ("People are Dying to Give us Their Business
MEL O DURRIS CHEMICALS
MELLON & RYPPE PRODUCE CO
Mike L. Angelo Paint Co.
MILKETT CREAMERY
MIRACLE CHAIR CO - "If it's a Good Chair it's a Miracle"
MONA LEASE ART SUPPLIES
MS PAGE TURNER, HEAD LIBRARIAN
MURKEY RESEARCH
N E PHICIENT HOME DESIGNS
N O PAYNE DDS, DENTISTRY, UPSTAIRS
N ONNIMOUS, INC
N SAHL VENTS & DUCTWORKS
N VEETRO FERTILIZERS ("The Makers of Fly-Bye Nitrogen")
NEUFELT MATTRESS CO
NEVAPADIT INSURANCE CO
NEVILLE E JECT
NEWTON D APPLETON, BOTANIST
NICKLES & DYMZ, CPA'S AND ACCOUNTANTS
NOAH ARKWRIGHT ANIMAL SHELTER
NOAH GOODE DRY CLEANING AND LAUNDRY
NOAH RUFF HANLIN, SHERIFF
NORYPPLE CORRUGATED IRONWORKS
O King Coal Co.
Oedipus Wrecks (Auto salvage - a real place)
O'LANG-ZYNE CORP
OLD FACTORY SMELTING
OLDEN & NEWEN USED CARS
OLDEN FUEL CO ("THERE'S NO FUEL LIKE OLDEN FUEL")
OUTTAHEER TRAVEL AGENCY
OWEN UPP, PASTOR
P C DOWNE COMPUTER SUPPLIES
PEABRAIN COAL CO
PEARL & FINDE OYSTER CO
PEOPLE'S NATURAL GAS
PERRY NOID ALARM SYSTEMS
PERRY SHIBBEL FRUITS AND PRODUCE CO
PFLATT TIRE CO
PHAR OUTS SMOKE SHOP
PHARTZ BAKED BEANS
PHIL A HOTAYER, Ballon Rides
PHIL McCRACKEN CONCRETE CO
PHILLIP TANKUM SERVICE STATION
PHYDEAUX PREMIUM DOG FOOD
PIG BUTTE PACKING CO
Pigeon Forge
PINNEDOWNE POLICE ACADEMY
PINT-O-PUCKER PICKLES
PITTHEWATER BREWERY
PLADD PAINT CO
Planck's Lumber Co.
POORE TEXACO SERVICE
PUHL-MYPHYNGER NATURAL GAS
R E GRETZ PARTY SUPPLIES
R E LODZ GUNS & AMMO
R H DEDMAN HOSPITAL OF DALLAS
R U RINSING LAUNDRY EQUIPMENT
R U WOBBLING CEILING FAN CO
RADISH SNACK ELECTRONICS
RAISIN RIVER
RANCID BUTTERFIELD STAGE EQUIPMENT CO
RANSZAK & STEELE INSURANCE
READMORE'S TV SHOP
RECTIFIER CLAIMS ADJUSTMENT CO
RED RYPPE TOMATO CO
RED TYLER ROOFING CO
REDDINK INDUSTRIES
Reed M. Weep Process Servers. Inc.
REIDMORE'S BOOK STORE
Rhea Produce Co.
RIDE-RITE SADDLE CO
ROBRES & THEVAS BURGLAR ALARMS
ROLLIN TIRE CO
SAIA-LYTTLE-PRAIRE SHIPPING CO
SAM AND ELLA'S CAFE
SANDY BERRY'S FRESH FRUIT FARMS
SAWDUSTVILLE CABINET SHOP
SCHOONER DONNY N MARIE
SCHWANN'S FEATHER EMPORIUM
SELLSUM INSURANCE AGENCY
SELMORE INSURANCE AGENCY
SHEESA MAKWAVY BEAUTY SALON
SHOPPE, 123 INCARCERATION AVE, LOCHUP, CALIFORNIA
SHUTER TRAPS & SNARES
SIC-SPHEET UNDERWEAR
SIM FONETTE MUSIC STORE
SIMON THE PIEMAN
SKIDMORE WAX CO
SLYDE, SKIDMORE AND SCREECH, ATTORNEYS-AT-LAW
SNAKE, ADDAR & KRATE DIVORCE ATTORNEYS
SNEED'S FEEDS
SPARKS FIRE EXTINGUISHERS
SPITTIN ROCK MINE
SPLITZ LUMBER - "All Our Boards are Checked"
SPOTTED OWL LUMBER CO
SPOTTED OWL TIMBER CO
STAGGER INN
STAR & SHIELD DOUGHNUTS
STAR & SHIELD DOUGHNUTS
STAREUPA DRESS MFG CO
STAVES BARREL MFG CO
STAYMON & WINESAP WHOLESALE APPLES
STEEL AND HYDE, ATTORNEYS
Steele and Paquet (Pronounced "Pocket" - a real law firm)
STERN LECTURE PLUMBING
STRADLIN FENCE CO
SUCHARD CANDY CO
SUPERIOR ERECTION - Construction Specialists
TALKSIC CHEMICALS
TALLEY & TALLEY LIVESTOCK BROKERS
TATE'S COMPASS CO - "He Who Has a Tate's is LOST!"
TAYE K CHANCE
TAYLE & MAYNE FEED SUPPLY CO
TEARS & HUGS MARRIAGE COUNSELING
TEAUX MAIN CANNERY
THE ALL-INCOMPREHENSIBLE INSURANCE POLICY
THE APEX AND HYPOTENUSE RR
THE BARKING LOT, DOG GROOMING
THE BUTTON WORKS
THE CONTINENTAL INTERNATIONAL
THE I M BORING CORP
THE N-M-E MINE CO
THE STUMBLE INN
THE YURZEN MINE CO
THREADWELL TEXTILES
THRIES CO
THROUGH: MRS FYNE'S FINER BAKED GOODS AND DOUGHNUT
THRUST & PARRY FENCE CO
TICKY-TACKY BOX CO
TILLY A HILL FARM EQUIPMENT CO
TINY TOTS POTATO FARM
TINY TURNER MUSIC CO
TITAN SINKS
TITANIC SINKS
TITANIC SINKS LTD
TOOT "N" C'MON INN
TOOTSIE ROLLER CO
TOSCANINI SEMICONDUCTORS
TRUCK-ME-IN, INC
TUNZA-VERMAN WAREHOUSE
TY M KILLER
U WILL FEALBETER. MD
U.R. Lucky Bailbonds
UNION DIVISION OF CONSOLIDATED CHEMICAL
UNION DIVISION OF CONSOLIDATED INDUSTRIES
UNSER-10 INDUSTRIES
VAIG ENTERPRISES
Van Allen Belt Co.
VIAGRA CONCRETE CO "Gets Hard - Stays Hard"
VOLLA TILE & FLOORING
VURMAN PESTICIDES
W E SNATCHEM DETECTIVE AGENCY
W E SNATCHEM FUNERAL HOME
W E SNATCHEM WRECKER SERVICE
WARREN T VOYD, INC
WASCHE & AYRN CLOTHING CO
WASTE-AWAY GARBAGE SERVICE
WATT R SAVER PLUMBING CO
WATT R SPILLER
WATT'S LIGHTING CO
WELCH BETTING SYSTEMS
WELLEN-DOWD LADIES UNDERGARMENTS
WENDY DAY'S KITE SHOPPE
WHEEZY'S TOBACCO SHOP
WHISTLER'S ART GALLERY
WHITEWATER LAND AND DEVELOPMENT CO
WILL M BARK, DVM
WISCHER'S WASHER MFG CO
WORLDWIDE INSURANCE GROUP OF
WUNZA NUFF MFG CO
X S COAL CO
Y. Knott Lumber Co.
YANKE-GOHOAM TRAVEL AGENCY
ZEEBOLT LIGHTNING ROD CO
ZIT VASE CO
During a recent visit to an office supply store I ran across some 2 x 3-inch stick-on labels in a variety of fluorescent colors. I’m now using them to color code my storage boxes to speed up the search process. Red for rolling stock, green for scenery materials, orange for structure kits and parts, and yellow for other items. These bright colors are instantly recognizable in the shadows beneath the railroad, and I’m using a black marker pen to identify the contents so I can spot specific storage boxes quickly and easily. – Jim Hediger, senior editor
Airbrush troubleshooting -Conquering the problems all airbrushers encounter.
by Paul Boyer
If your airbrushing experiences are trouble-free, you are blessed. Even with
years of experience, many modelers still have problems with their airbrushes.
While the following is by no means complete, solving (or avoiding) these common
problems will help a lot.
Spiders from Mars
Paint creeping out in a spidery star pattern is an indication of too much of
everything: paint volume, thinner, time spent spraying one spot, too close to
the surface, and so forth. First, close the paint nozzle until paint barely
comes out while you spray. While pressing the air control button, slowly move
the airbrush toward the test model. (You are using an unwanted test model,
aren’t you?) If you close in to where you’re producing a small dot of paint but
it is still "spidering," your paint is too thin, you have too much air pressure,
or both.
Reduce the air pressure (if you can), add paint to the mixture, and adjust the
paint nozzle until those arachnids disappear. Make note of paint-to-thinner
ratios, air-pressure settings, and the distance from the surface you’re spraying
so you can avoid this problem in the future.
Dusty, Lumpy Finish
This is usually the result of paint that’s not thinned enough or is nearly dry
when it hits the model’s surface. When paint dries this fast, it clumps on the
surface. Back off the air pressure and check the paint-to-thinner ratio.
Properly airbrushed paint should go on slightly wet, and if you’re using a flat
paint, the sheen should disappear in a few seconds.
To improve paint flow, add a few drops of Floquil Glaze (for enamels) or a clear
gloss (for water-based acrylics) to the paint/thinner mixture. This will help
keep the paint from drying too quickly or clogging the airbrush tip.
Puddles and runs
If you get puddles or runs, you’re allowing too much paint to come out of the
nozzle or you’re not moving the airbrush and the paint is piling up in one spot.
Keep the airbrush moving or cut back on the amount of paint in your
paint/thinner mixture.
Lots of Overspray
You don’t need to blast paint on the model and cover it with one pass. If clouds
of overspray form, you’re applying too much paint with too much air pressure.
Reduce the air pressure to 10 or 15 psi – that’s all you really need for
properly thinned model paints.
The other overspray problem is not as easily solved. If you’re painting a thin
line but notice a spattering to one side of the pattern, the cause is likely a
damaged paint nozzle. Whether you’re using a single- or a double-action
airbrush, either the needle (tip) or the nozzle (paint cap) can be the culprit.
Disassemble the airbrush to fix it. Use a magnifying glass and inspect the
needle. Does it have a hook? You may have dropped or bumped the airbrush and
bent the tip of the needle.
Sometimes you won’t be able to see the bent tip. In this instance, draw the tip
of the needle backward lightly across your fingertip – be careful, it’s sharp!
Rotate the needle 90 degrees and draw it over your finger again. Does it feel
the same? Rotate again and you’ll get a sense that one side of the needle drags
on your finger more than the rest. Determine which side of the tip is hooked and
lightly draw that side along 600-grit sandpaper or a medium-grit sanding stick.
Just make one pass, then test it on your finger again. Test and repeat until the
tip of the needle feels smooth all around.
The nozzle could be cracked, too. Use the magnifier to look for a ragged opening
or a crack down the side. If the nozzle is cracked, replace it.
Nothing’s Coming Out
Is the paint nozzle opening? If yes, then there is a clog somewhere behind the
nozzle. Remove the paint cup or bottle and watch for drips. If you can’t see
paint at the end of the siphon connector, the clog may be in the siphon. Perhaps
large chunks of pigment can’t travel up the siphon tube. Empty the paint from
the cup/bottle and clean the tube with lacquer thinner and a pipe cleaner. You
may have to strain the paint to filter out the big chunks.
If the paint nozzle is not opening (when you pull the button back on a
double-action airbrush), the needle is stuck in the nozzle and the locknut is
slipping. On a standard double-action airbrush, unscrew the handle and remove
it. Tighten the needle locknut and try pulling the button back. The needle
should travel back with the button.
LIRR Paint Colors
by Steve Hoskins Date: 03/20/1966
None of the scale companies actually marketed any colors as "Long Island Rail
Road" grey or orange. I used to model LIRR stuff and used to just use SP Lark
Dark Grey, and SP Daylight Orange. (Floquil)
Those two colors were not exactly correct, but what the heck, close enough for
the faded brush paint jobs that LIRR used to give equipment. I have seen someone
suggest that some two drops of Dark Blue be added to the grey to make it
correct.
LIRR has used various shades of the grey and orange over the years, and I can
remember when the orange used to fade almost to pink on the old MP54's. The grey
faded to about ten different shades, too. I would say to use what you feel
comfortable with, and suggest the colors I mentioned above as a starting point.
If you do the scheme with the slanted lettering, note that Walthers in their
62-78 set, makes this scheme. HOWEVER....fair warning....the lettering in the
Walthers set is BLACK. The lettering on the real LIRR engines was dark grey like
the majority of the body. (Same with their caboose sets, and those of Champ,
they mistakenly use black; the cabooses used the same dark grey for the roadname
lettering although because it was in so much orange, it sometimes looked blue.
It was never black, though!)
For the older grey and orange paint schemes, I would ordinarily just use Floquil
SP Lark Dark Grey and SP Daylight Orange. (I have seen some paint "recipes"
saying a little bit of blue should be added to the grey, and a little bit of red
to the orange. Straight out of the bottle worked for me.)
On to the MTA "Platinum Mist" (not the same as Amtrak's color of the same name)
and "Nordic Blue".....I was using Flouqil SP lettering grey for the "Platinum
Mist". I also used Testor's Light Grey too. For the blue, I did at one time use
Scalecoat EMD Demo Blue, but it had a bit too much metallic for what LIRR
started using in the early 1970's. So I just used Floquil "Light Blue" after
that. As for the yellow needed on some of the MTA paint schemes, I used Railbox
Yellow.
The tuscan red days.....nothing beats Floquil Tuscan Red.
RS-3 can be painted in three schemes: grey with orange ends, gray with the
orange sweep (worlds fair) MTA blue / yellow. C420 get either two or
three...200-221 are either Worlds Fair or MTA blue with yellow ends, 222-229
could also be painted in the blue/white "wave" same as the GP38s when new. RS1s
had I think 5 different paint schemes. as delivered black, Tichey, Goodfellow,
World Fair, MTA blue / yellow.
Add two more schemes for the C420 (L-2) locos...the two experimental schemes
tried out with pastel blue and yellow (MTA scheme), and the platnium mist
(silver) and blue MTA scheme.
Standard full-size newsprint rolls are 54 inches wide, or tall since they are
stacked on end, but there are also
1/2 and 3/4 width tabloid-size rolls. Jim Eager
In the 1930s to late 40s the color scheme would be Tuscan Red with gold,
Deluxe lettering. (#200 was built in 1932, remember. The other cars came later
in the 40s.)
In the late '40s to early 1950s the color scheme would be Tichy: light gray
body, almost-white top and block letters.
In the mid 50s you had a very dark body with orange end doors.
From the mid-50s to the early 70s you had the "Goodfellow Gray" scheme with
white block letters. Motors had orange ends. "Dashing Dan" was added in the late
50s. During the N. Y. World's Fair, an orange stripe was painted in the window
vicinity and the World's Fair logos were added:
"Travel Easy on the LIRR . . . Your Steel Thruway to the Fair Gateway"
They were scrapped in the early 1970s with the exception of #200 which has been
preserved at the RMLI in Riverhead.
Dave Keller
Ref: NJ International book "Cabin cars of the
Pennsylvania and Long Island Railroads" for the following information. The class
information has errors in it. Below are the correct classes.
Cabin car # 27, Class N22A, (Wooden caboose). Caboose red, White lettering,
original colors 1922, lettering had different styles depending upon year
painted.
Cabin Car # 47, Class N22A, (Wooden caboose). Orange body, Gray roof, gray
lettering, No "Dashing Dan" decal. Jan 21.1956
Cabin car # 2, Class N52A (with cupola), Orange body, black roof, black
lettering, No "Dashing Dan" decal. Early 1960's?
Cabin car # 34 Class N52A modified (without cupola), black roof, black
lettering. No "Dashing Dan" decal. early 1960's?
Cabin Car # 56-61, Class N22A (no cupola, straight sides) orange body, Black
roof, Black lettering (24" high & 6" stroke), Yellow hand rails, black ladders,
yellow stairs with black treads. Original paint scheme (Jan 1961), without the
letter "C" before the number. A later repainting used gray roof, gray lettering
(24" high, 6" stroke), Letter "C" added, Yellow hand rails, black ladders,
yellow stairs with black treads. 1970's. Both paintings had "Dashing Dan" decal.
Cabin car # C 63-C70, Class N22B (no cupola with bay windows), orange body,
Black roof, Black lettering (24" high, 6" stroke), Yellow hand rails, black
ladders, yellow stairs with black treads. Original paint scheme (March 1963)
with letter "C" before number. A later repainting used gray roof and gray
lettering (22" high and 6" stroke). Yellow hand rails, black ladders, yellow
stairs with black treads. Late 1960's to early 1970's. Both paintings had
"Dashing Dan decal".
It is interesting to note that the style (height, length and stroke) of the
lettering varied depending upon year and color painted.
Dick Horn
Railroad Museum of Long Island